On two Sundays in April, Björn Westeson shared his knowledge of grafting and tree care for those interested in the area of the Odlingsakademien. The first course took place in Bråbo outside Kristdala and the second in Lidhem outside Vimmerby, with 10 participants each. The course included the opportunity to purchase grafts of various apple varieties such as Cellini, Birgit Bonnier, Gravenstein, Bramley, Wealthy and Transparante Blanche, as well as 10 rootstocks from Gränna nursery.

The reason for grafting trees is that it is not possible to get the same variety as the original trees through seed sowing. The seeds simply give rise to a variety of new varieties without the possibility of controlling what will be produced. The approach to getting more trees of the desired variety, for example to preserve old varieties, is to replace the crown, or parts of the crown, by getting twigs to grow firmly on the rootstock or in branches.
The rootstocks used are of different varieties. Björn uses the A2 variety, which is a strong-growing and hardy variety. The grafting stock is annual shoots from healthy trees, taken during the winter and stored in moistened paper and plastic in the refrigerator until it is time to graft around this time in the spring. (This applies to pome fruit trees, i.e. pears and apples. For stone fruits such as plums and cherries, the procedure is slightly different). It is also possible to graft on wild apples and graft new varieties into old trees. Old trees should be pruned first to encourage new healthy shoots to be used.
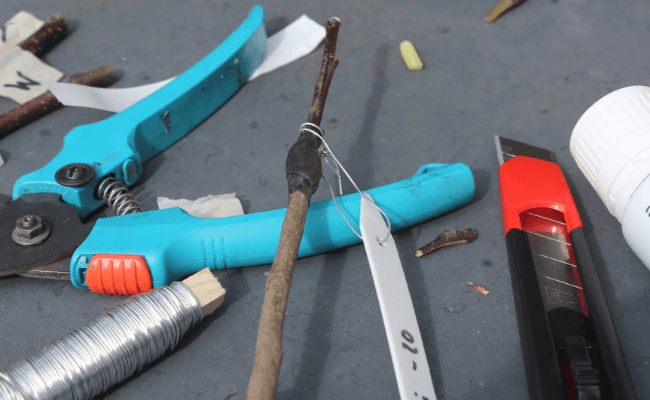
To carry out a good grafting, good tools are required:
- A secateur that gives fine cuts. Sharpen with a whetstone if necessary. Björn advises against grafting secateurs as they give too short a planting surface; the cuts should ideally be 2-3 cm long.
- Thin-bladed sharp knife.
- Vulcanized tape. Can be purchased where there are car parts. The advantage of the tape is that it activates and closes tightly when it is pulled out, but electrical tape can also work. Some people use bast instead, but it can be a little difficult to attach tightly.
- Grafting wax or wound balm to treat the cut surfaces with to prevent them from drying out.
- Labels, permanent marker and wire to mark the grafts. Mark and document carefully throughout the process!
- Plastic bags to make a mini greenhouse for the graft. Make a hole to drain excess moisture. Around midsummer, when the graft has hopefully taken root, you can gradually remove the plastic bag.
- Large pots to plant the small tree in until it grows bigger and can be planted out. It is advisable to place the pots in a so-called ”nursery” – an extra protected place where you can keep a good eye on the plants.
- Preferably an apron with large pockets for all your things.
When grafting into trees, you also need:
- A safe ladder with a crossbar at the bottom so it stands firmly. Preferably one that can be folded out into different positions.
- A good Japanese-toothed saw that only cuts in a pull motion.
- A holster to keep these tools safe and easily accessible.

The most difficult part of the entire grafting process was to make nice straight cut surfaces that fit tightly together. That's why the course participants first had to practice on water shoots of pears. It's important that the cambium layers (the light green inside the bark) come into contact so that the surfaces can grow together. When the cuts fit together nicely, the tape is wrapped to hold everything in place and all open cut surfaces are treated with grafting wax or wound balm, before they are marked and the plastic bag is pulled on.
The biggest threat to successful grafting is drying out. Therefore, grafting should not be done in excessively sunny or windy weather, the root system and cut surfaces should be kept moist, and it is important to use good bonding material and wax/balm. Do not touch the cut surfaces with your fingers.

The graft should have 2-3 leaf buds and any dried tips should be cut away. You also try to place the cut opposite a leaf bud because there is a lot of growth energy right there. The leaf bud is therefore on the back of the branch, approximately in the middle of the cut.
If you are not used to grafting, it is a good idea to leave a few leaf buds on the trunk in order to try to save a failed graft using grafting – inserting a leaf bud into the bark to encourage a new branch of the desired variety and then creating the tree from it. Whether the graft has been successful or not should be determined by whether it sprouts leaves within a few weeks and no later than midsummer.
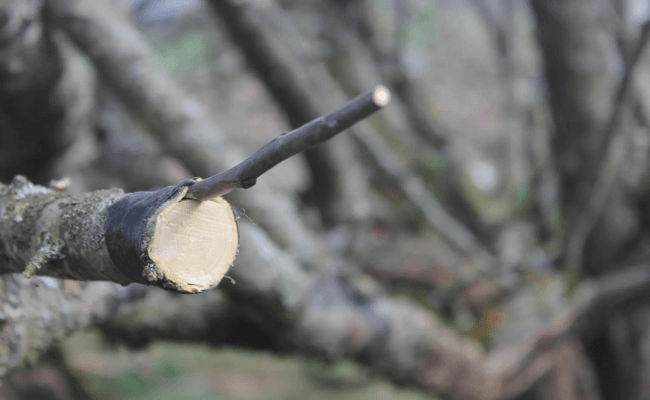
Another way to graft is bark grafting. Here, the graft is inserted under the bark so that the cambium layers make contact and should therefore have a little more cambium layer exposed by also removing a little on the sides of the grafting branch. A branch of 2-4 cm can be just right for this type of grafting and you can easily place two grafts opposite each other on a branch. If you take both, prioritize the top one and cut the lower one in while it helps to cover the wound. The grafting should be done when the tree has started to sap properly (April-May) so that the bark comes off easily. Stone fruits are bark grafted in a slightly different way.
Björn also talked about caring for young and old trees. More about that in the next part.